
Tiffany Teske is a superstar and has been featured and published in several magazines. One of those publications is Cloth, Paper Scissors and in the Nov/Dec issues from last year she was featured sharing her processes for fuji image transfer. As I explained yesterday, I have long wanted to explore emulsion transfer lifts and signed up for one of her image transfer classes thinking that is what we would learn. Last minute I realize that it wasn’t emulsion transfer after all, but as fate was working on my side, the class ended up touching on emulsion lift (enough to figure it out and do on my own later) AS WELL AS learning an entirely new-to-me technique that I think is a bit more involved and interesting than emulsion transfer, so I really lucked out. BOTH techniques ended up being something that I could do at home on my own, and didn’t even know it before.
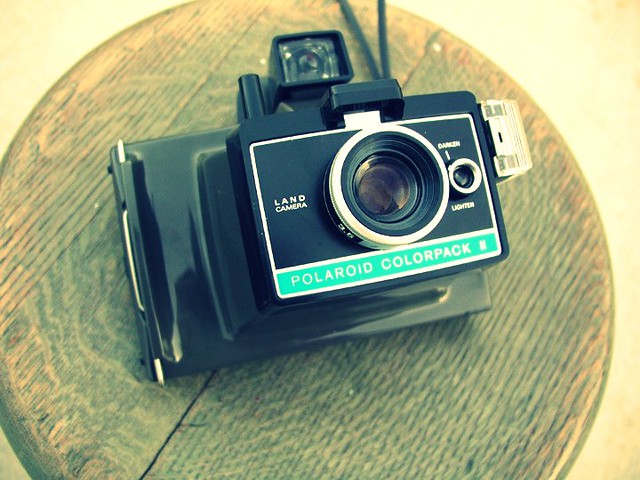
The image transfer and emulsion transfer techniques were something that was originally done with Polaroid films. Not all Polaroid film can do this and that was what prevented me from trying it myself at home. Since Polaroid has stopped production on their instant films, Fuji (and The Impossible Project) have picked up where they left off and started producing many films that can fit in Polaroid cameras. When people think of Polaroid film nowadays, they mostly think of the point and shoot and pop out pictures that develop in your hands, shake it like a Polaroid picture! But these are, for the most part, not the types of film you would use for these techniques. Land Cameras like the one pictured above and below, that take pack peel apart film. Fuji now produces 100 film that will fit Polaroid Land cameras. This is the type of film we used for the class, and can be used for both image transfers as well as emulsion lifts.

It wasn’t until the class that I realized that this camera and the film I had been buying already, would work for the technique I’d been dying to try out. Sometimes when I feel really dumb I picture myself, walking down the sidewalk, whistling a happy tune, joy in my heart but not a brain in my head, when suddenly from out of no where a brick comes flying at me and hits me in the head, wherein a trip to the ground. Finding out that I could do emulsion transfers with a camera and film I already had on hand felt like that. Long ago, after reading up on the emulsion transfer lift process and realizing it was a camera and film I didn’t have access too, I just since imagined it was one of those really obscure things that probably also died with Polaroid.

I’ll quickly describe the techniques, but if you are interested to tack a crack at this yourself I’d encourage you to purchase a back copy of the Cloth, Paper Scissors where Tiffany shares her techniques, or just peruse the internets. There are fabulous tutorials and videos out there now. Yeah, if only I had thought to do that myself in the last 5 years, doh!
For the class we did not use cameras, but instead brought our own developed photographs and then Tiffany introduced this amazing machine called the Daylab Copy System Pro. It allows you to place any image on a glass flatbed, load the pack film, and with mirrors and a flash, transfer your image onto the pack film. If you had a camera that loaded the pack film then you could do it straight from there. Normally, after an image is transferred to the film you would wait, then pull apart the film and negative/chemical side and find your photograph fully developed. In the image transfer technique you do not allow the film to develop to the photograph, and instead peel them apart immediately and place the negative/chemical side onto a porous surface where you want your image to transfer. For emulsion lift, you use the same exact film, let your pictures develop and soak them in VERY hot water until the “emulsion” with image separates from the backing paper. It is transparent and more plastic and durable as compared to polaroid which was more gel like and would rip and tear easily.
During the class I was able to do about 10 transfers and I would say it is definitely something that takes practice, but is fun. The transfer image is more rugged and rough, so if you are looking for a pristine image this might not be the technique for you. Also, depending on your timing, as well as paper quality and texture, etc., your image can turn up wildly different. I do like a weathered image, but I also realized I had a harder time trying to accept that my images didn’t resemble my original closer. I loved everyone else’s grit, but had a hard time accepting that my own was “good enough”. I think this was because I chose pictures that I had taken and that were somewhat already close to my heart. If I was working straight from a camera, I’d never really know what the original would have looked like. I have so many ideas I’d love to explore more, like double exposures and writing and drawing on the surface of the paper before transferring the image. I would also LOVE to get my own Daylab. I’ll have to keep my eye open on ebay as well as at the flea markets and garage sales. I’m sad to think I might have even passed one of these up recently because I didn’t know exactly what it was.
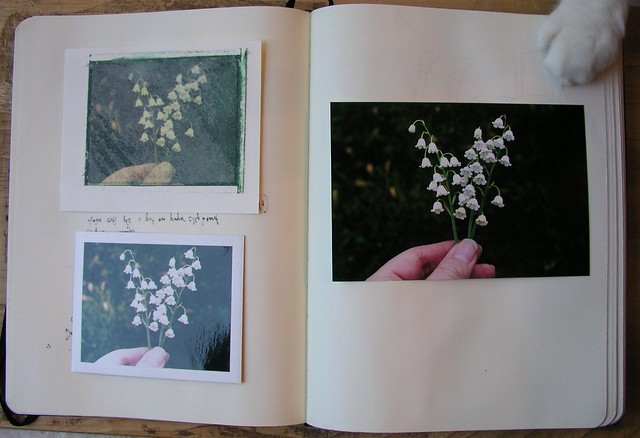
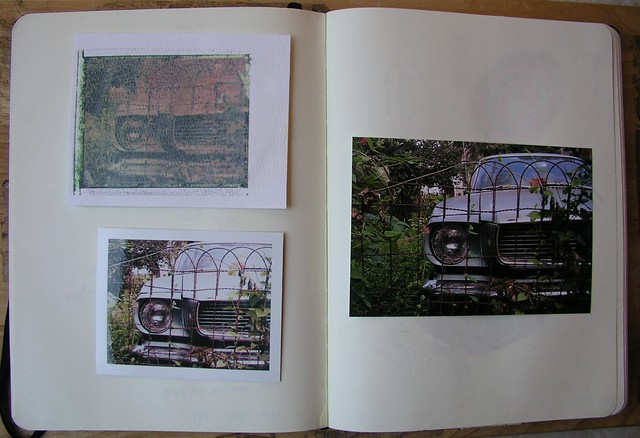
The above two photos are examples of image transfers that I did in class. The image on the right pages are the originals that I brought in, the bottom pictures on the left are the photos developed on the fuji 100 pack film (they should be fairly light because most of the chemistry should actually end up going into your image transfer) and then the top left images are my image transfers on watercolor paper.
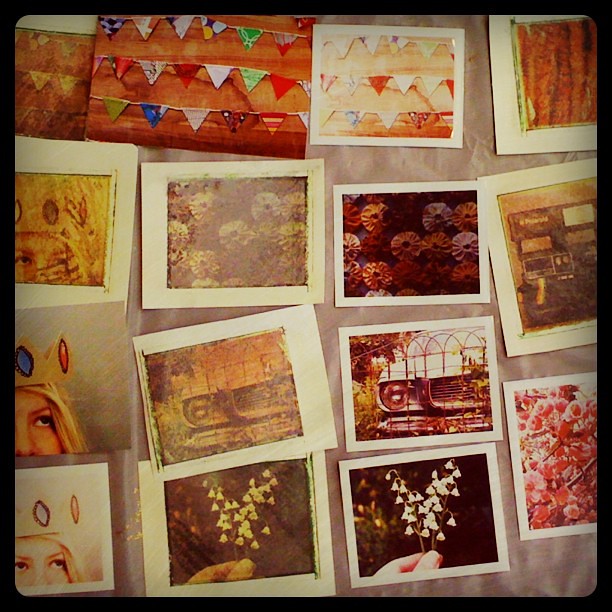
An instagram of the image transfers I did in class.
The class was great. I had fun experimenting, and learned way more than I expected… such as… did you know that the Impossible Project purchased the Polaroid factory that they work from, but not the chemistry, or instructions to create Polaroid film. They’ve had to hire their own chemists and have to figure things out for themselves. This is why Impossible Project film has to be protected from daylight when first developing, just like early on Polaroid film did. This is because they are working out the kinks on their own, just as Polaroid did when they first started out. Impossible Project film is not Polaroid film, but their own unique formulas. I find that fascinating.
A work too big for a too small result.
But if you want obtain bigeer emulsion transfers as DIN A3 and DIN A4, you only have to visit this site.
http://www.jellyfishphoto.es
There you can find what easy and cheap is.
Enjoy it.
Hi Rob,
I like the idea of transparency lifts and your work looks great. I would like to have a go at this but link for jellyfishphoto.es site does not work? Do you know if they are out of business!
Do this method only worked with their transparency prints or can it work with any transparency print?
Thank you for your help.
Regards
Umit